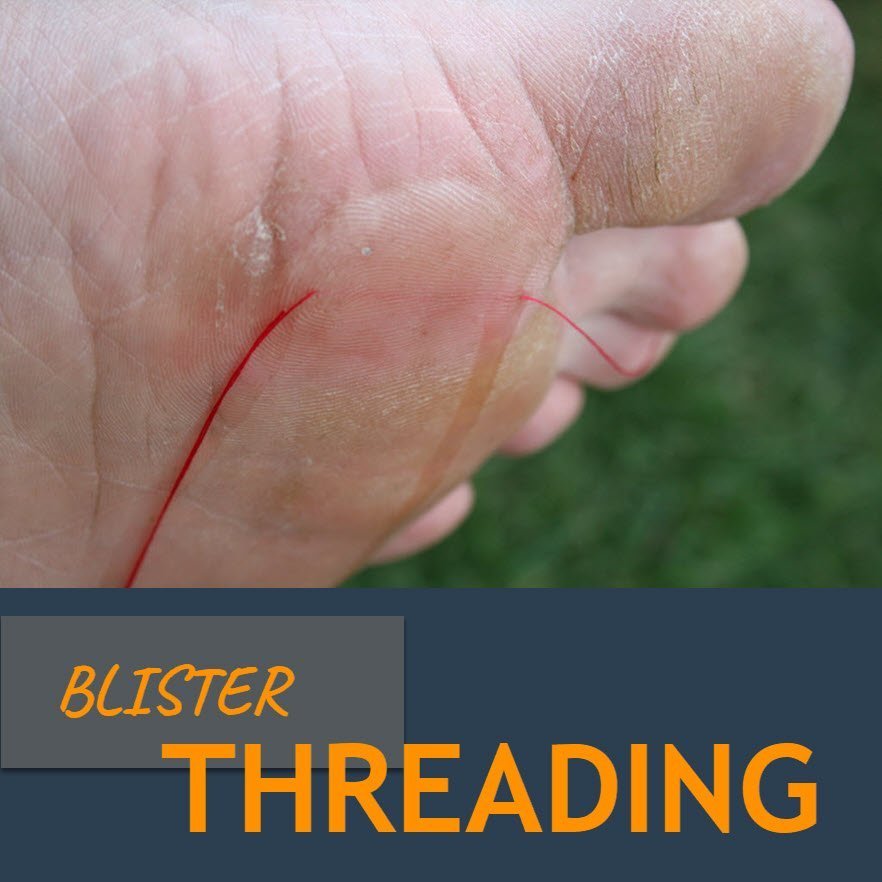
You’ve got a blister on your foot. And you’ve made the decision you want to drain it. Well, there's more that one way to skin a cat, they say. So in this article, you'll learn about the blister-threading technique as a method of how to drain a blister. Cotton is threaded through the blister with a sewing needle and left there to encourage the blister fluid drain out. I’ve suffered a lot of blisters in my time. But if there’s one method I would NOT use to drain my blister, it’s this one. I’ll tell you why shortly. But first, let me help you fully understand what this method involves.
Blister-Threading to Drain a Blister
This method has been around for years. It's called the needle and thread or blister-threading method. I’m not sure where it first came from, but it’s particularly popular with hikers. Essentially, it involves threading a piece of cotton right through your blister.
How To Drain a Blister Using a Needle and Thread. Here’s the gist of it, as quoted from a CNN travel reporter Narina Exelby :
Instead, pierce a threaded needle through one side of the blister and out the other, pulling the needle through so that only thread remains in the blister. Then, cut the thread so that there's a thread "whisker" on either side of the blister. The liquid will drain out slowly via the thread, allowing time for the new skin to harden underneath.
Here’s a slightly more detailed (and humorous) version of the technique from Barefoot Runner:
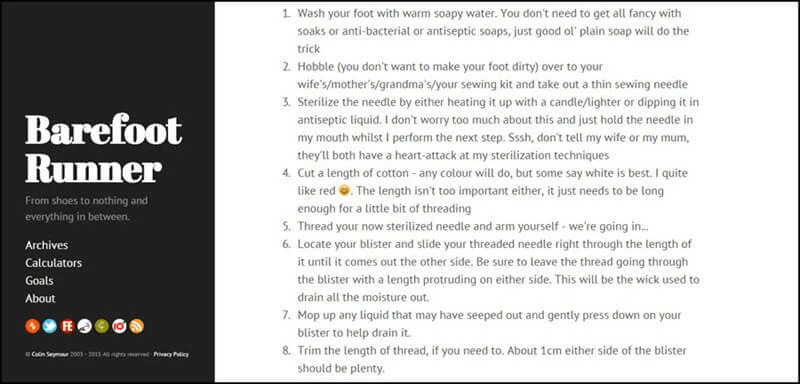
Blister threading technique to drain a blister, from Barefoot Runner
I have several problems with the threading technique and they all revolve around infection control
1. Sterilising The Needle
Most sources recommend heating the needle under the flame of a match or lighter. But how hot does it have to get to make it sterile / how long do you have to keep it under that flame? One second, 3 seconds, or more? This is kind of important! Get it wrong and you’re inserting a dirty needle into your blister.
Thinking back to chemistry and microbiology class, we used to heat that metal loop thing under the bunsen burner until it was glowing red. Here's a video that shows there are two types of flames; and only the blue flame is good for sterilising.
This video goes a step further. It shows that the flame you get from a candle (or match) is a yellow flame - the wrong type of flame for sterilising (1:20min). Notice the black deposit that sticks to the glass when it's passed over the yellow flame? That’s carbon. When you heat your needle with the yellow flame from a match or lighter and poke that through your blister, these carbon deposits will fall off in your blister and become an irritant (read the tips and warnings section), increasing the likelihood of trauma at the blister base and infection.
2. Sterilising The WHOLE Needle
The whole needle has to pass through your blister. Therefore, the whole needle has to be sterile. How do you heat the whole needle, til it's glowing red ... and still hold on to it? What do you hold it with to keep the end you just heated up, sterile? I can’t see how you can (easily) end up with a sterile needle for the threading procedure.
3. Is The Thread Sterile?
Simple answer … NO it’s not. Unless you've put it through an autoclave or steriliser! To sterilise instruments and dressings, my machine (I'm a podiatrist) heats its load to 134 degrees Celsius at 2.10kPa pressure and maintains that for 12 minutes. Otherwise, anything less and it is not sterile!
Let’s say you did manage to get hold of some sterile cotton. How are you going to thread it through the eye of your sterile needle? More often than not, there's a bit of saliva involved. Did you know the mouth is one of the dirtiest parts of the body
4. A Super-Highway Into Your Blister
Let's say that (by some miracle) no bacteria entered your blister on the back of your dirty needle and thread. Now, unfortunately, with the thread running through your blister end to end, there's a bacterial super-highway in place - just waiting for bacteria to jump on board! Generally, the thread is left there at least a day, usually more. So your blister has got all day(s) long to get infected!
And think about what happens when you finally drag that piece of cotton all the way out. The germs on one end get dragged all the way back through your blister.
Or am I just being pedantic?
Why Is Infection Control Important?
Dealing with the pain of a blister, the inconvenience of blister treatment and the downtime in waiting for it to resolve is bad enough. But an infection is a whole different story. It can lead to severe systemic reactions and death in severe circumstances. Early signs of an infected blister to look for include pus, increasing pain, swelling, redness and warmth. Even more than that, be on the look-out for red streaks extending around the blister and upwards - this require urgent medical attention.
But Is Blister Infection Likely?
On the one hand, a blister lies within the epidermis – the outer layer of skin that keeps what’s inside our body in, and what’s outside our body out. It's kind of a safe zone. This means you won’t automatically get an infection when a bacteria exists in the epidermis. learn more about blood blisters here>.
On the other hand, when you prick your blister and put something foreign into it, you're that much closer to the layer where the blood vessels are – the dermis. We're talking about only a few cells width between safety and infection!
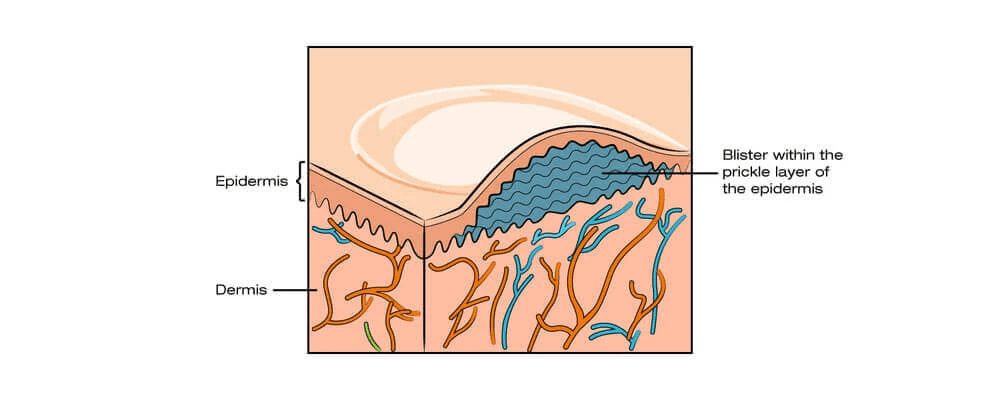
Blisters occur in the prickle layer of the epidermis
Besides, it's the outermost layer of the epidermis (the corneum) that's the real safeguard. It’s tough, hardy and quite impenetrable to irritants and germs. In contrast, a couple of layers down, the prickle layer (still in the epidermis - where blisters exist) is much more fragile and raw.
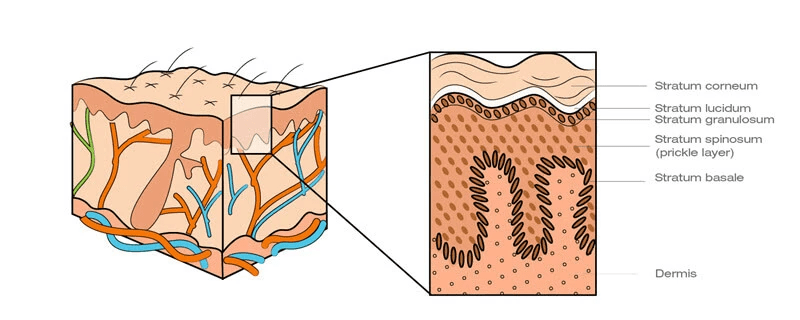
The prickle layer of the epidermis is very close to the dermis - where blood vessels exist
How fragile and raw? Just take a look at the deroofed blister below. What you can see is the blister base. This is within the stratum spinosum (prickle layer) of the epidermis. I don't know about you but it looks pretty raw and fragile to me! I'd say the slightest irritant (thread, carbon, grit) could easily wear through to the dermis, with infection the result.
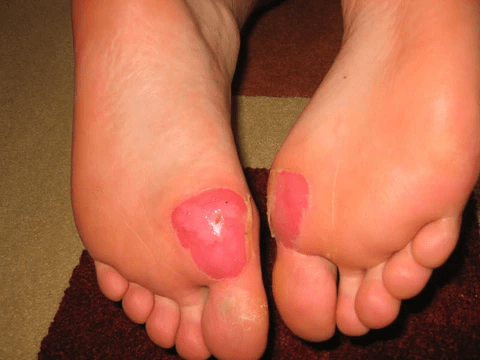
Deroofed blister - the blister base is at the level of the stratum spinosum (prickle layer). This is still in the epidermis, where there are no blood vessles. But this layer of the epidermis is fragile.
The Right Way to Lance and Drain a Blister
I understand threading a blister to drain it has worked well for many people over many years. But I simply cannot recommend it and in fact, advise against it.
I’m not against lancing (popping) and draining a blister. In fact, I think it can be a good option when the blister is large, painful and likely to tear anyway. But, to do this yourself, you must have the right equipment to be able to do it safely, and understand the danger of it (opening it up to infection).
My Advice on Draining Foot Blisters
Pack a couple of scalpel blades or hypodermic needles in your blister kit. Why? Because:
• They’re sterile for starters (without you having to do anything to them)• They’re light and small so they pack down well in your kit
In fact, why not buy our Sterile Blister Lance Pack? It's got all the things you need to perform four lancing and blister treatment episodes, without the fear of infection.
These items are single-use (don’t use them twice and definitely don’t let anybody else use them after you). And they need to be disposed of appropriately. That means into a sharps container, not into the bin or general waste.
Me, I prefer the scalpel blades. They put a decent-sized hole in the blister roof to reduce the likelihood of it closing and filling up again. It’s what most race medics use when treating blisters at running and hiking events. You can see more blister lancing videos here.
Summary
- The blister threading method of draining a blister is fraught with infection risk.
- Lancing a blister with a sterile scalpel blade or hypodermic needle is a better alternative.
- Lancing a blister opens it up to infection so it should only be done if appropriate equipment is on hand. If in doubt, do not lance it. Read this article for blister treatment recommendations.
